February 27, 2017

Planning in a Traveler's Notebook: Planner Struggle & March Setup.


If you follow me closely on my other social media like instagram or youtube, the things I am going to tell you now, might be old news to you. But if not, here it goes.

For the past several weeks I have been struggling to use my planner, I didn't have enough room to actually make it work as a functional planner, add some pretty embellishments and at the same time be still pleasing to the eye. I also used to carry my planner everywhere but had started to leave it at home because it was too bulky and heavy. Add to that the fact that some of my additional traveler's notebook covers didn't work as planned. It was time to face the inevitable: the way I had sought out to plan in 2017 in the beginning of January needs to be changed. I filmed a lengthy video about my planner struggles, please check it out here.


My idea is to switch things up completely by using a personal size traveler's notebook starting in April, this should help with the weight and bulkyness. For the month of March, I decided to go back to my Cocoa Daisy insert, the DaisyDori in standard size and try to use one whole page for daily planning. This should address the issue of roominess. Again, I filmed a process and setup for my March DaisyDori, what I didn't expect was that I was completely stumped when it came to the layout of the daily pages. So I decided to take it one step at a time and only prepare the first couple of days and then move forward from there.

And finally, the last thing I wanted to share is by far the most exciting: I have been chosen to be on the Cocoa Daisy Day Planner Team for 2017. Alongside other lovely ladies I will be sharing my planning and memory keeping process with their products and hope to be inspiring to you all!

February 22, 2017

April Lilli Design Team: Geschwisterplüsch.


For my April Lilli Design Team projects, I have been digging deep into my stash of photos that are on my computer but have never been printed. This photo was taken by a preschool photographer and I loved it ever since I got it. The hurdle: it was only given to me in digital format and somehow I never ended up printing it. When I saw that photo with the flowers in the foreground I knew I had found the perfect match for the "Adore you" paper by Crate Paper.


I fussy cut the flowers but needed something for the background. I didn't want to go the same route, however, of using gesso and the packaging technique as I did with the XOXO Layout. I know now, I can do that kind of mixed media and I will definitely do more in the future but not this time. So I tried to enlarge one of the flowers on a scrap piece of paper and then used this as a template for piercing holes and embroidered the outline of the flower. I then dug out my oil pastels from Faber-Castell and lightly shaded the flower to easily distinguish the flower from the white background.


When it came to putting the layout together, I felt the boxed shape of the photo to be very disturbing, none of the other shapes were linear and so I bravely cut into the photo and cut their silhouettes. To further embellish I used the flowers that were cut from the paper, some pieces from the ephemera pack and the floral shape that was on the chipboard sheet. The title literally translates to "sibling plush" and perfectly nestles in between the flowers underneath the photo. I added in tile stickers from Studio Calico for the first part of the title.

Lastly, I added splatters. Well, I shouldn't have done that because they went all wrong, I wanted them to be big and they were only resembling tiny, misty drops. And worst of all, one of them landed on a strand of embroidery floss and dyed it black. After some mourning, I decided to add the heart embellishment clusters and I really like the way they finish off the layout. So the accident wasn't that bad after all.

If you read all the way up to here: thank you! Go check out the Crate Paper "Heart Day" collection in April Lilli's shop which is still 20% off until the end of February 2017.

February 21, 2017

Journaling in a Traveler's Notebook: January Journal


Just in case you haven't seen me sharing photos and videos of this project, I wanted to collect them all here, so that it is easy to check them out. I stopped doing Project Life in the traditional style in a 12x12 album for 2017. Instead I am now journaling in a Traveler's Notebook insert, specifically a DaisyDori from Cocoa Daisy in the standard size. I didn't know where I was going with this in the beginning of January and just started with what was on my mind at that time.


The first part of the journal is reflecting on goals and things I want to achieve in 2017 and then went on to journal about all the events and moments, big and small that I wanted to remember. I specifically made sure to journal from my point of view and only talk about things that are important to me.


This journal is stuffed full with stickers, cards, washi tape and stamps. I still try to balance the page but I enjoy the messy look, it reminds me of the way people used to fill their smashbooks when they were still popular. I love the way this complements my scrapbooking layouts, which are so different but no less fun to make.


Here are all the videos for my January Daisy Dori.
I am already working on my journal for February and can't wait to share the videos and process with you!

February 15, 2017

April Lilli Design Team: XOXO.


Here is my second project with the Crate Paper Heart Day collection which is still 20% off in the April Lilli Shop. This layout is another mixed media layout. I really enjoy exploring all of these new options and simply play. I try not to go out and buy new products, but instead use what I already have and try to incorporate it into my scrapbooking. There is a process video on my youtube channel for this layout, so go and check it out!


I primed my background with gesso, then used Neocolor II and the heart stamps that are from the Heart Day stamp set to create the background for my photos. I used the chipboard XOXO for my title and added a couple of die cuts from the ephemera pack.

The enamel dots are just the interior parts of the wood buttons from the dimensional embellishments, I love this little trick. Because my title ended up being very close to the left edge I decided to add a patterned paper strip to the left so that the title would move more towards the center. The grey cardstock helped to distinguish between the two pattern papers, this way I was able to use them side by side.

If you want to know more about my decisions and why you shouldn't erase pencil on gesso, simply watch the whole Scrapbooking Process: XOXO Layout.

February 2, 2017

April Lilli Design Team: Easy Valentine Cards for Mass Production


Last year for our first Valentine's Day in the US, we knew little about the significance this day had in the school year and that children exchanged little gifts. So my sons were ill prepared and we ran to Target the day before the class party to get the last cards that were left on the shelf. I really hate buying those little plasticky toys that get thrown away immediately and was so annoyed about the crap my sons brought to school. I love to give things that can be used up, so this year I am better prepared. I reused an idea from a card that one of my sons received last year and made it work for us.


I searched the silhouette design store for cut files with fish and finally settled on this very basic shape. In the software I deleted the heart and resized and multiplied the shapes to fit on a 8.5x11 sheet of paper since I have a Silhouette Portrait. I ended up with eight fish on one paper.


If you do not have a printer like me, this might be interesting for you: it is "print and cut" vintage style. I then took white cardstock, traced one of the outlines where I punched out my fish and typed the sentence into the shapes of the eight fish using my old typewriter. Then I went to Staples and had them copy my text several times on cardstock, which I then also ran through my Silhouette Portrait.


I then glued one patterned fish and one white fish together, added wiggly eyes to both sides using my Glossy Accents and punched a hole into the fishtail to attach a snack size Goldfish package.

Now we are all set for Valentine's Day! If you still need an idea, this is a fun and quick project that you can create with your kids. Have fun! If you still need pretty paper for your cards, head on over to the April Lilli shop, where you can get this collection for 20% off the original price during February 2017. There is also a video on youtube where you can have a closer look at the Crate Paper "Heart Day" collection.

February 1, 2017

April Lilli Design Team: Crate Paper "Heart Day"


Can you believe it is already February?

For this month April chose the Valentine's line "Heart Day" by crate paper to be the featured collection in her shop. For the whole month of February 2017 it will be 20% off the original price. I have filmed an unboxing for you where I show you the papers and tell you my ideas and thoughts on the collection. I have already been working with the papers and embellishments and can't wait to show you my ideas. Since I am most active on instagram make sure you follow me there so you won't miss any sneaks and closeups of my projects. a talk about my ideas for this wintery collection.

January 31, 2017

April Lilli Design Team: Winter Wonderland.


This is my last and final layout that I made with the Winter Wonderland collection for the month of January. Even though I only needed two projects, I couldn't stop creating. This photo doesn't really have a story, I just liked the colors and the atmosphere it conveyed. But then I found the perfect journaling which simply reads: "Alright, sometimes even I can see the beauty of Winter."

I fussy cut the title from one of the cutapart sheets and felt that it needed something to sit on top. So I went with the last bits of my favorite paper and added a strip to the bottom of the layout. I nestled one of the die cuts right underneath the title. To frame the layout I added a thinner strip to the top.


For this layout I slapped some acrylic paint on an 8.5x11 piece of cardstock, simply because I didn't know how this would turn out and I didn't want to waste anything. I used a dry, wide flat brush and just put the colors straight onto the cardstock. I love that you can see the brush strokes so well. Then I put my photo on several layers of patterned paper. I used the red paper twice because I loved how the red helps to bring out the colors in the photo.


I added one of the embellishment clusters to the right of the photos and one on the top left corner. I used all of the snowflakes that were included in the collection's cardboard stickers as well as fussy cut some from various patterned papers. To ground the embellishment cluster at the top I used parts of two tags. As on most of the layouts I made with this collection, I added some enamel dots to finish out the layout.

And if you want to see all of these layouts up close and personal, I just posted a layout share on my youtube channel here: Winter Wonderland Layout Share.

January 24, 2017

April Lilli Design Team: Silvesterwanderung.


This is another layout where I found inspiration in another layout: Wish List by Audrey Yeager. As I said in this post before: there is usually one or two things about a layout that stick out to me and that inspire me. Here it was the stacked photos, the strips of patterned paper and the use of a notebook punch. With this in mind I ventured out on my own and came up with the layout above for the april lilli shop.


I knew I wanted to back my layout with the woodgrain paper and add stitching, emphasizing the corners happened by accident when I didn't pay attention and my stitching line went too far. So I made it a design element by stitching back and forth on all corners and I really love the detail it adds.

If you are wondering about the use of white and cream colored paper on one layout, I regard those as two different colors and have no problem using them together. In order for the notebook paper to pop from the background I used another piece of the dark brown paper. The notebook paper lend itself perfectly as a journaling spot.

The title was so long that I decided to emphasize the vertical lines created by the paper strips even more and placed it on top of the third paper strip. I then added stitching lines to all of the papers after I punched them all with my notebook punch.

I backed the photos with cards from the cutapart sheet and cut them down so that only a very small border was showing. I felt I need to break up the rigid lines of the layout and added some brown Distress Ink using a stencil by Tim Holtz. The only embellishment I added was that brown deer from the sticker sheet.


Here is the story that is on the layout which is titled "Silvesterwanderung" meaning "New Year's Eve hike". We have been going on these hikes since our college years when we went hiking with a group of friends, taking a picnic and bratwurst for a winter BBQ in the snow. We always had such a great time and kept this tradition even after we started a family on our own.

This particular year, we took our bikes and rode to a lake where we made a fire in a fire pit and grilled bratwurst. We underestimated the length of the tour and how cold it got in the evening and the ride back home was freezing. But we made it.

January 17, 2017

April Lilli Design Team: This View.


I am not going to talk much about this layout because I have a process video for it on my youtube channel. Go check it out here: This View and hear about the story and the design process. Please hop over and take a look! The Winter Wonderland collection by Simple Stories is still 20% off in the april lilli shop. Below you will find a few close ups.


January 15, 2017

April Lilli Design Team: Mein Held.


This layout was greatly inspired by a layout from Jen Schow who is a guest designer for Cocoa Daisy this month. I loved the idea of making a grid design from journaling cards and having a flair in the middle. It took me a while to finally come up with this 8.5x11 layout and I had to waste a whole sheet of 12x12 paper to finally come to this solution. When I scraplift a layout or take a layout as inspiration I often just take one (or in this case two) ideas from the original and don't go back looking at the inspiration while working on my own layout. I believe that this approach helps me develop my own style.


As I wrote above, I fiddled with this layout for a long time and then when I compared the end result to Jen's layout, I found that I didn't deviate too far from it after all. The story is about another hat - I chuckled when I noticed that two of the five stories were about hats. Especially, considering the fact, that I didn't start wearing hats until I had kids. The title of the layout is "Mein Held" which translates to "my hero" and it talks about the story that my mom started selling this special crochet yarn (myboshi) in her store and made hats for all of her grandchildren for Christmas one year. The response to my question: "And where is my hat?" was a small package for my birthday in February. But the best part about the hat was that not my mom had crochet the hat for me but my dad!


I used four 3x4 journaling cards from the cutapart sheet for the background and then only added the exclusive heart flair to the middle. On the top right I added a little embellishment cluster made from the die cut set and another cutapart from the 6x6 paper pad. Then I sprinkled some enamel dots in groups of three on three places on the layout. I felt the layout needed some kind of border, so I took a brown pen and drew a line all around the edge. I added some zigzag lines in two places to mimic zigzag stitching and I really like how they turned out. Head over to the April Lilli shop to get this collection for 20% off.

January 13, 2017

Documenting December in a Traveler's Notebook


I have been meaning to share my December Daily video series here on my blog but I somehow never got around to doing so. I have a complete series of videos sharing my process of Documenting December in a Traveler's Notebook. Today I uploaded the last video: a complete walk through my insert for 2016.


I created a playlist where you will find all of the videos including a tutorial on how to sew your own fabric cover, the kit that I used to embellish the pages, a walk through my insert of 2015 as well as several process videos. Here is the link to the playlist: Documenting December in a Traveler's Notebook.

January 12, 2017

April Lilli Design Team: In love with my new hat.


After receiving the Winter Wonderland collection from April Lilli, I went back to my wintery photos from several years ago and found five stories that I thought would work with the color scheme. Since I only started scrapbooking in 2014 I didn't have to worry whether any of my stories had been documented yet.

I figured, if I printed all of them, it would be easier to make the two projects required for my DT assignment. Well, it didn't work that way - I ended up with five layouts for all of the five stories, because ideas for the next layout started forming while I was still working on the previous layout. And I just couldn't let them go. So here is the first: "In love with my new hat". Several years ago I used my birthday money to buy a hand knit hat from Monika and it was my favorite hat for a long time.


I was immediately drawn to the deep brown of the paper and so I needed to use that one on my first layout, I divided the paper in thirds and cut a 4 inch strip. The photo was then placed where the horizontal and vertical 4 inch lines meet. For the layers behind my photo, I grabbed a vellum bag with gold dots, papers that I ripped using my ruler and several die cuts from the die cut pack. I also fuzzy cut the large snow flake from one of the cards from the cut-apart sheets.


I really loved the red chipboard heart and incorporated it into my title, which is made from white older 7paper letter stickers as well as even older brown Authentique tile letter stickers. In the beginning I did not mean to put the journaling on the tag in the vellum bag, but after I had a general idea of what the layout would look like, this was essentially the perfect spot for it.


I used several phrase stickers from the 12x12 sticker sheet as well as the sticker pack for further embellishments. And then I almost forgot to use enamel dots because I am such an enamel dot hoarder. But the idea of being on a Design Team is to showcase all the products, right? So I generously added them to all the right places and I really think they add the finishing touches.

Over the next two weeks I will be sharing the other layouts that I made using this collection and will also have a video at the end of the month. If you haven't seen my unboxing video yet, check it out here: Unboxing Simple Stories Winter Wonderland.

January 8, 2017

April Lilli Design Team: Simple Stories "Winter Wonderland"


I have been chosen to be on the April Lilli Design Team for the first half of 2017. I'm so excited! If you followed me for a long time you know that I love sharing my passion with you all! To have the opportunity to help a small business grow and reach more people and maybe get some of you interested in and passionate about scrapbooking feels really great.

Every month there is a featured collection in the April Lilli Shop which is 20% off the original price. For the month of January 2017 this is the Simple Stories Winter Wonderland collection. I have filmed a very detailed unboxing for you where I talk about my ideas for this wintery collection. I am still working on several ideas and will be sharing them with you here on my blog, on instagram and over on my youtube channel.

December 12, 2016

Scrapbooking Plans for 2017?


Yes, I am going to change things up. I have summarized the topics here, but if you want to know more about the whats and whys you should watch the video.
  1. I am not continuing Project Life in 2017.
  2. Start a "Project Me" journal in a Traveler's Notebook.
  3. Documenting our family adventures in mini albums, layouts and journals - there are no limits.
  4. Continue working on my sons' albums.
What about you? Are you changing things up? And why?

November 6, 2016

On my ears: podcast recommendations

I have tried to come up with a catchy introduction phrase to this blogpost forever but the more I write the crazier it gets. I only wanted to recommend two podcast episodes to you that I listened to just recently. They both talk about kids. I don't know how you raise your kids, but I struggle the most with raising our firstborn son. Not because of him (turns out he is actually the "easiest" of them), but because we practice our parenting skills on him. There is always trial and error, expectations set too high, rules too strict and rules too loose involved. And every time when we think, we found our groove and everything goes smoothly, the child matures some more and everything is out of order. Again. It is like trying a computer game for the first time and the moment you think you finally got it, you get to the next level and you start all over ...

This year our next level is middle school. The difficulty level is high because Micha and I both have grown up in another country, in a totally different educational system. So middle school is not only new to our son, but also new to us. I was very happy when I stumbled upon this episode from "This American Life" that centers all around middle school. It tells and reminds us of the struggle most middle schoolers go through - finding their place in society and the world and physically and emotionally growing their bodies and minds to become an adult. If you have a middle school child - please take the time to listen to this episode: This American Life -#449 Middle School.

Every night, I get an email from my son's middle school showing his grades. In most subjects, everything he does, gets graded: every assignment, every homework, every paper he produces in class. His grades are always changing. He is a good student, but it is so tempting to define this child only by his grades. To ask: "Will I be surprised, when I look at your grades tonight?" Or: "Why did you forget to put your name on an assignments twice? Are you crazy, your grade is going to drop?" And yes, I have asked these questions, and I assume, I will ask them in the future. It is hard to let go of habits and it is very convenient to intervene at an early stage, isn't it?

Last night, I watched Julie Lythcott-Haims's TED talk on "How to raise successful kids without over-parenting". She delivered a powerful speech about what really matters for our kids. And it was a great reminder that we all should give ourselves from time to time. What our kids need most from us is our unconditional love and a tool set to master their lives by themselves instead of mapping it out for them. If you have 15 minutes, please let her convince you. Julie Lythcott-Haims: "How to raise successful kids without over-parenting".

November 4, 2016

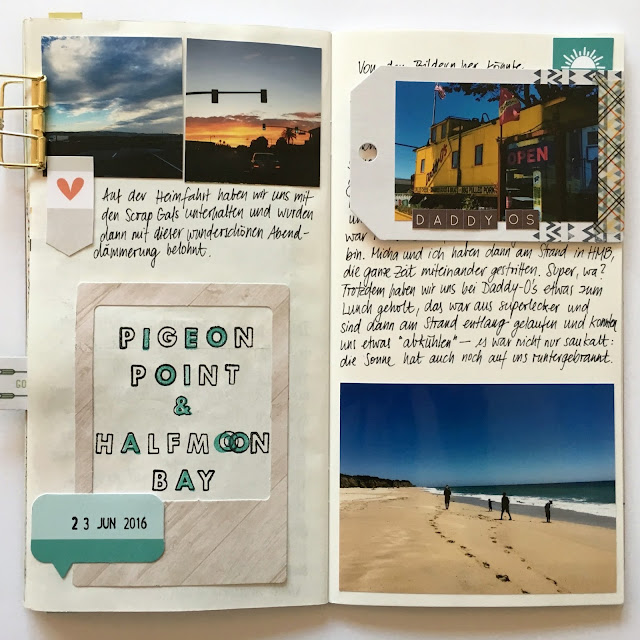
Journaling in a Traveler's Notebook: Summer Journal 2016 Pigeon Point and Half-Moon Bay


I really enjoy journaling in my Summer Journal. This is why I am trying to work on it constantly. I am remembering so many details and want to preserve them all. The details of this specific trip are not so great, because I had a really bad day and picked a fight with my husband because I forgot to check the weather forecast and forgot my sweater at home. If you want to see the process, there is a video on youtube.

November 3, 2016

Planning in a Traveler's Notebook: October Review and November Setup


I would have never thought that I needed a monthly overview, but when I decided last month that I wouldn't use it, I actually went back and filled it in about 5 days into October. So this month I made sure I filled in all the events and get a good feeling for the month.

How do I utilize the monthly overview? I mark birthdays, holidays, school breaks. I add appointments, regular activities (in the mornings) and events. I do not need exact times because I don't use it for accurate planning. As I said before: the monthly overview gives me a feeling for the month, this is where I can find out if my goals align with the ongoing events. This is where I notice: "Shoot, THIS is actually November, if I want my kids to have an adventcalendar by December 1st, I have to do it BEFORE that day." Or: "I am reading in the classroom on Friday, there is two other appointments in the mornings that week, don't plan on getting any crafty time in." Or: "If I want to send a postcard for that birthday, I need to send it by that date because it takes a week to get there."

Are you using a monthly overview in your planner? And if so, how are you using it? If you want to see what my October planner pages looked like and see how I decorated Novembers planner spread, here is a video.

November 1, 2016

The story of the quilt. Or: Patchwork blanket that is far from perfect.


Two or even three years ago, I gave my husband a voucher for a handmade blanket. I did not specify exactly what it would look like but I actually had an idea in my mind. He is a big fan of the San Francisco Giants and I would make him a blanket out of different orange, grey, and black fabric squares, a very simple but also (in my opinion) very sophisticated fan-blanket.

Then I started collecting different fabrics in the colors of the color scheme and I thought about the construction of the quilt. I wanted it to be a real patchwork quilt. But if you know me and know me more than just soso, you might also know that sometimes what looks like procrastination is in fact perfectionism. I wasn't able to start because I didn't know how to start. I knew that I would have to put a lot of time and effort into construction a quilt that would meet my own expectations. And I also knew that even if I tried very hard, I would still not be satisfied because I just don't have enough experience.


Fast forward to last week, when I realized that it was not about making the perfect quilt and that it was not about the neatest mitered corners or the most intricate quilting or even about sewing straight lines. My husband wouldn't notice any of these things. He would however see that I chose the team colors of his favorite team, he would appreciate the time and effort that I put into making something for him and he would also snuggle in that blanket each and every night.


It took me about 3 days to finish cutting out the squares, assembling the quilt top and then quilting along each column. I had already found the perfect backing for the quilt last winter at Jo-Ann's. I then went ahead and cut a wide binding strip so that I would not have to worry about the edges and used my sewing machine to bind the quilt. Done! Not perfect in the eyes of a quilter. But perfect enough for me! I am so happy that I finished this project and it fills me with such a warm feeling seeing my husband toting his new blanket around like Linus from the Peanuts.

October 29, 2016

Project Life youtube series


I have started a new youtube series on my youtube channel where I share a new process video every Saturday. There are already several videos on my channel for 2016. Here is a link to the playlist:

October 21, 2016

Planning in a Traveler's Notebook: What is in my Fabric Dori.


Somehow, I can't keep up with blogging. That is why I am keeping it short and just directing you to my busy youtube-channel. I am trying to upload a video every Monday with planning content, here is my latest planning video.